Total Pageviews

Wednesday, 28 August 2013

Livecycle Designer: Creating repeating and multipage subforms

Creating repeating and multipage subforms

You can place a subform anywhere on a page; however, when a large amount of data is merged with the form, the subform may expand beyond the bottom edge of the rendered page. To deal with this issue, you can either select the Allow Page Breaks Within Content option to cause the server to break the subform in the middle or deselect this option to force the entire subform to the top of the next rendered page. Forcing a subform to the next page ensures that any nested subforms are displayed together on the same page. If you do not select the Allow Page Breaks Within Content option, you will probably want to create an overflow leader and overflow trailer subform. (See About overflow leaders and trailers.)
When data is merged, the server positions the content of a subform within the confines of content areas only. In cases where a large amount of data needs to be merged with any of the objects in a subform, a subform may span multiple form pages. When a form page is filled, the server automatically renders another identical page and continues to place the subform on the new page unless you explicitly direct the flow to a different content area or master page. When more than one content area or master page exists in the same form, you can specify whether a subform will be placed in a particular content area or positioned according to the specified master page.

To create a repeating subform

  1. In the Hierarchy palette, select the parent subform of the subform you want to repeat. (See About subforms).
  2. In the Object palette, click the Subform tab, and in the Content list, select Flowed.
  3. Select the subform to repeat.
  4. In the Object palette, click the Subform tab and, in the Content list, select either Positioned or Flowed.
  5. Click the Binding tab and select Repeat Subform For Each Data Item.
  6. To specify the minimum number of repetitions, select Min Count and type a number in the associated box. If this option is set to 0 and no data is provided for the objects in the subform at data-merge time, the subform is not placed when the form is rendered.
  7. To specify the maximum number of subform repetitions, select Max and type a number in the associated box. If you do not specify a value in the Max box, the number of subform repetitions will be unlimited.
  8. To specify a set number of subform repetitions, regardless of the quantity of data, select Initial Count and type a number in the associated box. If you select this option and either no data is available or fewer data entries exist than the specified Initial Count value, empty instances of the subform are still placed on the form.
    Note: The value in the Initial Count box must be between the Min Count and Max values. If the Min Count value is not specified or is 0, the Initial Count value defaults to 0.

To specify a subform to span multiple pages

Subforms can be placed anywhere in a form design. However, when a large amount of data is merged, the subform may expand beyond the bottom edge of the rendered page.
To deal with this issue, you can either enable a page break in the middle of the subform or force the entire subform to be rendered starting at the top of the next rendered page. Forcing a subform to the next page ensures that any nested subforms are displayed together on the same page.
When data is merged, the content of a subform is placed within the confines of content areas only. In cases where a relatively large amount of data needs to be merged with any of the objects in a subform, a subform may span multiple form pages.
When a form page is filled, an additional identical page is rendered automatically. The subform continues to be placed on the new page unless you explicitly direct the flow to a different content area or master page. When more than one content area or master page exists in the same form, you can specify whether a subform will be placed in a particular content area or positioned according to the specified master page.
To enable a subform to span multiple pages
 In the Object palette, click the Subform tab and select Allow Page Breaks Within Content.
When this option is deselected, the objects in the subform are kept together on the same page.

About overflow leaders and trailers

Because the length of a form that has a flexible layout varies depending on the amount of data merged with the form, forms that have a flexible layout are often longer than one page. Using overflow leader and overflow trailer subforms is an effective way to start and finish subforms that repeat over multiple pages. You can use any subform that is configured to position content as an overflow leader or trailer. For example, in the Purchase Order sample form, the detail subform is configured to position content and repeat for every data item. When the form is merged with data, if the first page has insufficient space to display all occurrences of the detail subform, a new page is added and the data continues to flow into the next content area.
When data flows this way across multiple pages, you may want to carry forward onto each new page certain text such as "Continued from previous page" or specific formatting elements such as a column header row that includes the descriptive labels for each column of data. Using column header rows on each subsequent page makes the resulting form much easier for users to follow. To do this, you can create an overflow leader subform that will act as the column header row for each additional page. In the Purchase Order sample form, for example, the detailHeader subform is selected as the overflow leader. As a result, a copy of the detailHeader subform is rendered at the top of every new page before the first occurrence of the detail subform.
Similarly, you may want to include information following the last occurrence of the repeating subform, at the bottom of all pages except the last page. For example, you may want to include text such as "Continued on next page" at the bottom of these intervening pages. To do this, you can create an overflow trailer subform for the repeating subform in the same way that you created an overflow leader subform.
When a subform overflows to the new page, the server performs these operations:
  • Places the overflow trailer on the current page
  • Places the overflow leader on the next page
  • Flows the expanding subform and the remainder of its repeating objects onto the new page
An overflow leader is a special type of positioned subform that appears at the top of the next page whenever a page overflow occurs.
Overflow leaders are similar to the heading row in a standard table. The heading row appears at the top of the table and contains a descriptive label for each of the columns in the table. You can format the table so that when it expands beyond one page, the heading row is repeated at the top of the new page. This makes the information in the table easier to understand as the reader moves from page to page.
An overflow leader subform behaves in a similar way. When you specify that a specific subform will be the overflow leader for a subform that repeats, the overflow leader subform will appear once before the repeating subform at the top of the current page and each subsequent page thereafter.
The repeating subform is added as many times as necessary when merged with data. When there is no more room on the first page, a new page is added and the data continues to flow into the next page until all the data is consumed. The overflow leader subform will appear once at the top of each page.
You can see an example of how an overflow leader subform is used in the sample form design whose layout adjusts to accommodate data that is included with Designer ES2. The sample, Purchase Order.xdp, is in the Samples folder where Designer ES2 is installed on your system. In that example, the subform named detailHeader acts as the overflow leader for the repeating subform named detail.
Bookend leaders are subforms that appear before a repeating subform. If you define a subform sibling just above a repeating subform and then specify it as an overflow leader, you have defined it as a bookend leader and as an overflow leader.
An overflow trailer appears at the bottom of the next page whenever a page overflow occurs. Use an overflow trailer to include information that appears only once, after all the data is positioned.
Bookend trailers are subforms that appear just below a repeating subform. If you define a subform just below a repeating subform and then specify it as an overflow trailer, you have defined it as a bookend trailer and as an overflow trailer.

To create and assign overflow leaders and trailers

An overflow leader or overflow trailer is a positioned subform that can be assigned to any repeating subform. Typically, you create the subform that will become overflow leader or trailer first. Then you assign them to a repeating subform and give them overflow properties.
If the overflow leader is also treated as a bookend leader, it is placed in the Hierarchy palette just above the subform. Also, if the overflow trailer is also treated as a bookend trailer, it is placed in the Hierarchy palette just below the subform.
To create an overflow leader or overflow trailer subform
  1. Create a form design with all the necessary subforms.
  2. On your form design, locate the subform that you want to use as an overflow leader or an overflow trailer, select the subform, and do these tasks:
    • Look at the Subform tab in the Object palette. Ensure that the Content list displays Positioned. In the Object palette, click the Subform tab and make sure that Positioned is selected in the Content list.
    • Look at the Binding Tab in the Object palette. In the Object palette, click Binding tab and select Repeat Subform For Each Data Item to have the leaders and trailers appear for more than one overflow. Bookend leader and trailers are not counted against this number.
To apply an overflow leader or overflow trailer to a subform
  1. Select the subform or subforms that you want to repeat.
  2. In the Object palette, click the Binding tab and select Repeat Subform For Each Data Item to set the subform to repeat.
  3. In the Object palette, click the Pagination tab and, in the Overflow box, specify either a content area or page where the form should place the overflow subforms."]
  4. If you want to specify an overflow leader, in the Overflow Leader list, select the subform that you want to use as the overflow leader subform for the current repeating subform. Alternatively, select New from the Overflow Leader list to create and assign a new overflow leader subform.
  5. If you want to specify an overflow trailer, in the Overflow Trailer list, select the subform that you want to use as the overflow trailer subform for the current repeating subform. Alternatively, select New from the Overflow Trailer list to create and assign a new overflow trailer subform.
    Note: You do not need to have both an overflow leader and an overflow trailer. Whether you have one, both, or none is determined entirely by the requirements of your form.

Livecycle Designer: To create a table that grows using the Button object

Masud' solution To create a table that grows using the Button object 

  1. Insert a Table with one row and three column for practice purposes.
  2. Now Select Table-->Select Row1--> in the Object palette-->Select Binding tab-->and check "Repeat Row for Each Data Item"
  3. Add a button
    • In the click Event-->Type the following javascript code:
    • this.resolveNode('Table1._Row1').addInstance(1);
  4. Delete button
    • In the click Event-->Type the following javascript code:
    • try
        {
          var rowNum = this.parent.parent.index;
          this.parent.parent.instanceManager.removeInstance(rowNum);
        }
      catch(err)
        {
         app.alert("The minimum number of rows is 1");  
        }

To create a table that grows using the Button object  

You can create a table that adds a row when a user clicks an Add Row button. You can also include a Delete Row button. You must create the table, add the buttons, and then set the properties that will make the table grow.
A. Buttons that add a row or delete a row B. When the user clicks the Add Row button twice, LiveCycle Designer ES adds two rows.

To create a table that grows using the Button object
  1. Select Table > Insert Table.
  2. In the Insert Table dialog box, select Create Table Using Assistant and click OK.
  3. In the Body Layout panel of the Table Assistant, select Body Rows Vary Depending On Data.
    This creates a table that adds or removes rows, depending on the data sent to it.
  4. Enter the number of columns and click Next.
  5. (Optional) Select Has Header Row and click Next.
  6. (Optional) Select Has Footer Row and click Next.
  7. (Optional) Select Has Body Rows And No Sections and click Next.
  8. (Optional) Select Alternate Row Colors and click Finish.
  9. Save the form as an Adobe Dynamic XML Form (*.pdf).
    Now, you must add the buttons that will be used to add and delete rows.
To add the buttons
  1. Select the first cell of the body row and, in the Object palette, click the Cell tab and select Subform from the Type list.
    This cell needs to be a subform so that it can contain two buttons.
    You can also drag the Subform object from the Object Library palette into a cell in the table.
  2. In the Object Library palette, click the Standard category and drag the Button object into a cell in the body row. For example, place it in the first cell of the body row.
  3. In the Object palette, click the Field tab and type Add Row in the Caption box.
  4. Repeat steps 2 and 3 to create a Delete Row button.
  5. Select the Add Row button and, in the Script Editor, select Click from the Show list.
  6. In the Script Editor, select JavaScript from the Language list.
  7. Type the following script:
    Table.Row1.instanceManager.addInstance(1);
    
    
    To modify the script for your own form, you must understand how the script relates to the hierarchy. For example, in the hierarchy for the current form, both buttons are inside the same subform; therefore, you do not need to specify any objects beyond the Table level.
  8. Select the Delete Row button and, in the Script Editor, select Click from the Show list.
  9. In the Script Editor, select JavaScript from the Language list.
  10. Type the following script:
    Table.Row1.instanceManager.removeInstance(1);
    
    
    To reuse these buttons in another form, you can add them to the Custom category (or your own category) of the Object Library palette. Note that you may have to edit the script for the button if you use it in a different form.
  11. View the form in the Preview PDF tab.
    For example, this is what you would see if you modified the Part table from the Purchase Order template.

Adobe Acrobat: How to merge files into one PDF

How to merge files into one PDF:
  1. Within Acrobat XI, select File > Create > Combine Files into a Single PDF.
  2. Click Add Files and select the files you want to add.
  3. Click, drag, and drop to reorder the files and pages. Double-click on a file to expand and rearrange individual pages. Press the Delete key to remove unwanted content.
  4. When finished arranging the files, click Combine Files.
  5. Select File > Save As > PDF.
  6. Name your PDF file and click Save.

Tuesday, 27 August 2013

LiveCycle: Text Field grow to accommodate Text

Once you’re in edit mode you follow the steps: The key to making the text fields grow to accommodate text is to:
  1. Make them multiline (Object palette > Field tab > Allow multiline property). Make the Text Field Multiline
  2. Make them expandable in height (see “Making a Field Expandable” here). Screen shot: Make the Text Field expandable in height
  3. Put these Text Fields in a flowed subform *Note: you can highlight all your objects and use the contextual menu (right click) to ‘Wrap in a subform’
    • Select the subform whose Object palette > Subform tab > Content property: is set to “Flowed”
    • That allows page breaks within its content (via the “Object palette > Subform tab > Allow Page Breaks within Content property”). Screen shot: Choose the subform and make the layout 'flowable'
4. Allow their contents to break across pages (Object palette > Field tab > Allow Page Breaks within Content property). Screen shot: Allow the Text Field content to 'break across pages'

5. Just don’t for get to save it as a Dynamic PDF
Have you ever lived through the frustration of previewing a form on which you’ve written a simple little script to affect the presence of an object when a button is clicked and pulling your hair out because you keep clicking on the button and nothing happens (object doesn’t disappear, there’s no error message, etc.)? Or maybe you’ve been in a situation where you’ve added script to a button in order to insert a new instance of a repeatable subform and while clicking on the button doesn’t produce one, the submitted XML data file contains entries for each new instance that was added?
Even if you haven’t, it may happen someday so here’s the remedy for the case of the “Common (Static PDF) Flue”…
In Designer, there are two different locations containing settings which affect the type of temporary PDF file created when you click on the Preview tab:
  1. Under the “File Options” section within the “Document Handling” panel of the “Tools | Options” dialog, you can set the Default File Type for New Forms. This type is used on new forms which you preview prior to saving (because Designer doesn’t know which format you’ll use at the time of preview). This is set to a static PDF format by default.
  2. Even if you’ve specified a dynamic PDF format for the Default File Type for New Forms, this setting may be overridden by the Preview Type and XDP Preview Formatproperties in the “File | Form Properties” dialog in the “Defaults” panel once you’ve saved your form. The Preview Type property, set to “Interactive” by default, determines whether the form will be previewed as an interactive (dynamic) form or as a print (static) form. This property supersedes the PDF format. The XDP Preview Format property usually picks-up the Default File Type for New Forms setting and determines what PDF format will be used to preview your form should it be saved as an XDP. (Note that if you’ve saved your form as a PDF file, then the XDP Preview Format setting is ignored).
Now that we’ve covered the different properties which affect the PDF preview format, here’s how to kick that flue I was talking about earlier (so that you actually do preview in a dynamic PDF format and stop pulling your hair out):
  1. If you haven’t saved your form, make sure the Preview Type is set to “Interactive” and that the Default File Type for New Forms is set to a dynamic PDF format. You may also want to set the XDP Preview Format to a dynamic PDF format while you’re at it.
  2. If you’ve saved your form as a dynamic PDF, make sure the Preview Type is set to “Interactive”.
  3. If you’ve saved your form as a static PDF, none of these settings will help you. You must first save your form as a dynamic PDF.
  4. If you’ve saved your form as an XDP, make sure the Preview Type is set to “Interactive” and the XDP Preview Format is set to a dynamic PDF format.
  5. If you’re tired of running into these problems and want to avoid them in the future, just set your Default File Type for New Forms to a dynamic PDF format.
I hope this tip improves your form design health. It did wonders for me!

Tuesday, 20 August 2013

PDF Form: Ranking, Sorting Formula in PDF Form

Create a text field:
  • Edit-->Select the text field-->Properties-->Format tab->Number
  • Edit-->Select the text field-->Properties-->Calculate tab-->Click radio button: Custom calculation script-->Edit: 
    var n1=this.getField("Number2Row1").value;
    var n2=this.getField("Number2Row2").value;
    var n3=this.getField("Number2Row3").value;
    
    var arr = [n1, n2,n3];
    var sorted = arr.slice().sort(function(a,b){return b-a})
    var ranks = arr.slice().map(function(v){ return sorted.indexOf(v)+1 });
    event.value=ranks[0];

Here: n1, n2 and n3 will get the value from all the text fields will be included in the ranking.


Example of Javascript code for Ranking Array Elements:
Problem:
I need an algorithm to rank elements of an array in Javascript.
Example : I have an array as follows:
[79, 5, 18, 5, 32, 1, 16, 1, 82, 13]
I need to rank the entries by value. So 82 should receive rank 1, 79 rank 2 etc. If two entries have the same value they receive the same rank and the rank for a lower value is raised.
So for this array, the new ranking array would be:
[2, 7, 4, 7, 3, 9, 5, 9, 1, 6] 
How can I do this ?

Solution:
var arr = [79, 5, 18, 5, 32, 1, 16, 1, 82, 13];
var sorted = arr.slice().sort(function(a,b){return b-a})
var ranks = arr.slice().map(function(v){ return sorted.indexOf(v)+1 });
Result :
[2, 7, 4, 7, 3, 9, 5, 9, 1, 6]
If you want to be compatible with old browsers, you may have to define a shim for indexOf and for map (note that if you want to do this very fast for very big arrays, you'd better use for loops and use an object as map instead of indexOf).

Monday, 19 August 2013

Livecycle Designer: Changing the background colors of fields, fillable areas, and subforms

Dynamically setting image field href

I'm trying to dynamically set an image field on my LiveCycle PDF form. On my form onReady function I have some Javascript code that is executing. For some reason, if I explicity set my image field to a string value, everything works. However, if I try to dynamically set it using a value from a text input, it doesn't work.

Any ideas? I've used app.alert to make sure that the value in the textfield is correct.

//Try to set image field to a string value. [WORKS]
swatch1.image.value.image.href = "http://localhost/qs/images/waterswatch.png";
 
//Alert Value of text field (Result: http://localhost/qs/images/waterswatch.png )
app.alert(swatch1.imgPath.rawValue)
 
 //Try to set image field dynamically. [DOESNT WORK]
 
 
swatch1.image.value.image.href = swatch1.imgPath.rawValue;


Changing the background colors of fields, fillable areas, and subforms

This example demonstrates how to change the background color of subforms, fields, and fillable areas on a form in response to form filler interaction at run time.
In this example, clicking a button changes the background color of an associated object.
Note: To manipulate the background color of objects at run time, you must save your form as an Acrobat Dynamic XML Form file.
To see this scripting example and others, visit the LiveCycle ES2 Developer Center at www.adobe.com/devnet/livecycle.
Scripting the subform and text field background colors
You set the subform and the text field background colors by using the fillColor method. For example, the following line is the script for the subform:
    Subform1.fillColor = "17,136,255";

The following lines make up the script for the background color of the text fields:
    Subform1.Name.fillColor = "102,179,255";
    Subform1.Address.fillColor = "102,179,255";
    Subform1.City.fillColor = "102,179,255";
    Subform1.State.fillColor = "102,179,255";
    Subform1.ZipCode.fillColor = "102,179,255";
    Subform1.Country.fillColor = "102,179,255";

Scripting the fillable area background color
When setting the background color or the fillable area for each text field, your scripts must access properties that require a reference syntax expression that includes the number sign (#). Because JavaScript does not interpret the number sign (#) properly in reference syntax expressions, the script uses the resolveNode method to resolve the expression.
    xfa.resolveNode("Subform1.Name.ui.#textEdit.border.fill.color").value = "153,204,255";
    xfa.resolveNode("Subform1.Address.ui.#textEdit.border.fill.color").value = "153,204,255";
    xfa.resolveNode("Subform1.City.ui.#textEdit.border.fill.color").value = "153,204,255";
    xfa.resolveNode("Subform1.State.ui.#textEdit.border.fill.color").value = "153,204,255";
    xfa.resolveNode("Subform1.ZipCode.ui.#textEdit.border.fill.color").value = "153,204,255";
    xfa.resolveNode("Subform1.Country.ui.#textEdit.border.fill.color").value = "153,204,255";

Saturday, 17 August 2013

Livecycle Designer: Currency symbol and localization


Looks like locale is exposed up to the sub-form level. For demonstration purposes, I have a sub-form with amount, tax, and total, I can toggle the locale on the click event of a button called 'localeBtn'.

// form1.page1.subform1.localeBtn::click - (JavaScript, client)

if (form1.page1.subform1.locale == "en_GB_EURO") {
     form1.page1.subform1.locale = "en_US";
}
else {
     form1.page1.subform1.locale = "en_GB_EURO";
}
toggle_locale1.pngtoggle_locale2.png

USD en_US 
EUROS en_GB_EURO 
POUNDS en_GB 
RENIMBI zh_CN 

Steve

Thursday, 15 August 2013

Word 2010 Form: Reference to Plain Text Control

Source:


This Microsoft Word Tips & Microsoft Word Help page offers several solutions to the question, "How do I enter data in one place in a document and have it automatically repeated in other places?" My intention is not to reinvent the wheel, so after a brief introduction I may simply send you on to an existing tips page or other web article containing full explanations of some of the more comprehensive methods. See section 7, Content Controls, if you want to go directly to information about the new Content Controls introduced in Word 2007.

1. Userform

A Userform provides a graphical User Interface (UI) with a document template which you can use to prompt your document user to enter all pertinent data.  User entered data is then populated in one or multiple locations in the document.

2. On-Line Form

If you find a Userform daunting, or if you want to avoid VBA and macros, then you might try a Word on-line (protected) form.
  • On-line forms are Word documents that have "fill in the blanks." They are like a pre-printed form with "fields" on the screen instead of blank lines on paper.
  • The beauty of on-line forms is that you can fill in one field and Word will fill in or populate "most" other designated "like" fields automatically. An example of an on-line form is provided in the following demonstration project.

On-Line Form demonstration

Site Note IconNote: While this demonstration and illustrations were created using Word 2003, the method is wholly functional in Word 2007/2010.  If you plan to use On-line (protected) forms in Word 2007/2010 see my: Classic Form Controls.
  • Open a new blank document. Click View>Toolbars>Forms. The forms toolbar opens.
  • Type - "Customer Name " and then insert a text form field using the forms toolbar.
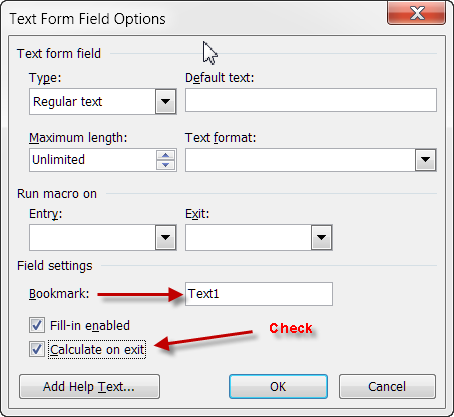
  • Double click the text form field to display the options dialog. Note the bookmark name (Text1) and check "calculate on exit."
Site Note IconNote: Text1 is the default name for the first text form field inserted in the document. You can change this name to practically whatever you want to better suit your application.
repeating data 1

repeating data 2
  • Now enter one or more REF fields in your document where you want to repeat the customer name. REF fields fill the role of the "like" fields I mentioned earlier.
Site Note IconNote:  When adding your REF fields remember they must point to the correct target.  If you rename your form field's bookmark name (e.g., from Text1 to Customer) then your REF field must point to Customer e.g., {REF Customer }.
Site Note IconBonus Tip: You can quickly enter REF fields by typing and selecting "REF Text1" (excluding the quotes) and then pressing CTRL+F9.
  • After you have entered one or more REF Text1 fields, press the Protect Form icon on the Forms tool bar. Type a name in the form field and press TAB. Word will populate the REF Text1 fields with the name you entered in your form field.
repeating data 3

repeating data 4
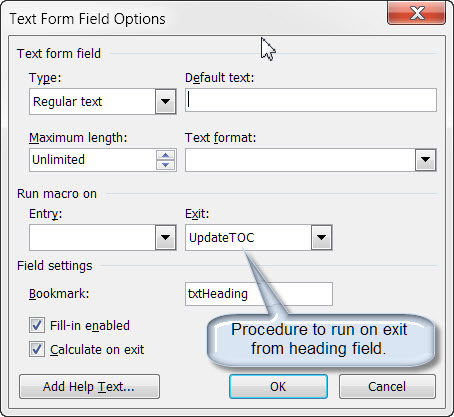
1. In the introduction to this section I stated that Word will fill in or populate "most" other designated "like" fields automatically. REF fields that are located outside the main text range of the document (e.g., headers, footers, text boxes, etc.) will not automatically update on exit from the field. However, there are some well suited work a rounds. You can use a STYLEREF field as described in MVP Suzanne Barnhill's presentation on STYLEREF fields, or you can run a macro on exit from the field that will update all of the fields, including REF Fields, anywhere in a document. For more on macros for working with the field collection in Word, see: Field Macros.
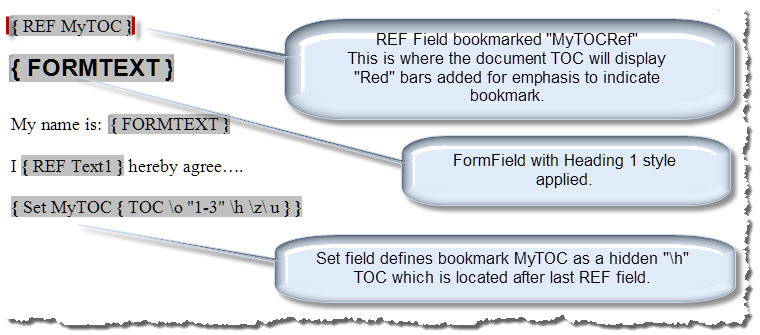
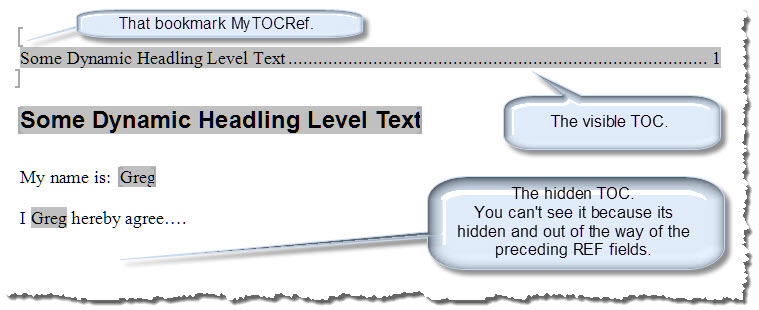
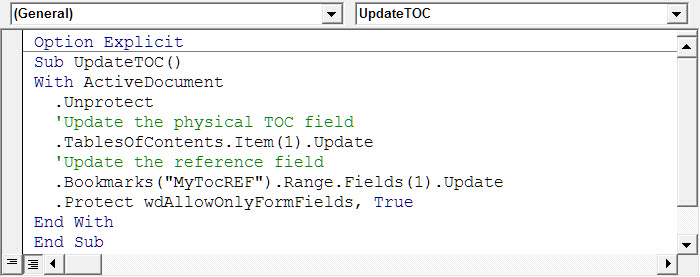
2. For reasons too complicated to go into here, REF and other field codes will not be updated using "calculate on exit" if the REF field follows a TOC field in the document. Provided that you don't need the TOC to update after protecting the document, you can simply lock the TOC field (select it and press CTRL+F11) before protecting the document. When you need to update the TOC you can unprotect the form and unlock the TOC with CTRL+SHIFT+F11. If it is essential that the TOC itself be "dynamic" and updated based on real time formfield text changes then you can use the method illustrated below.
repeating data 5

Document TOC field is physically located following last REF field

repeating data 6

Visible TOC is displayed by the REF field

Process requires a bit of VBA

repeating data 7

Code to execute

repeating data 8

3. Bookmarks

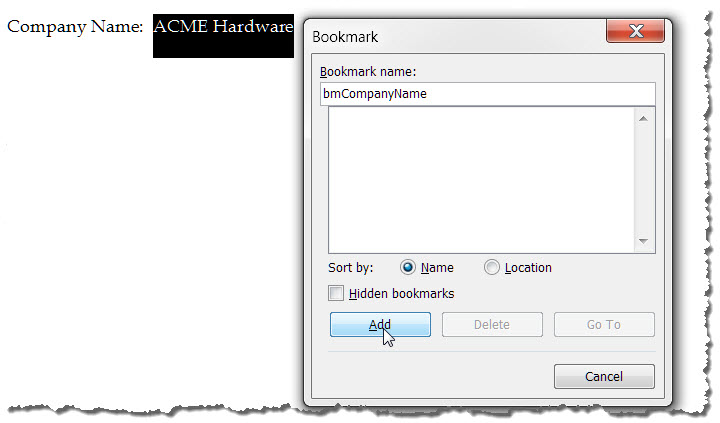
Probably the easiest method is to simply select and bookmark the text you want repeated and use REF fields as described above.
  • The menu sequence Insert>Bookmark opens the Bookmark dialog box. Here we are creating a  bookmark "bmCompanyName."
repeating data 9
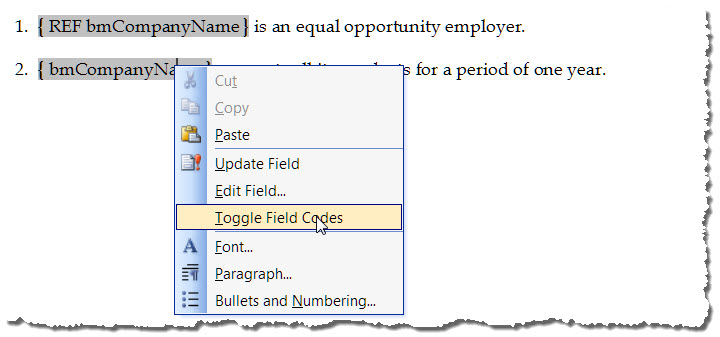
  • Create the REF fields as described above, right click, and select update field
Site Note IconBonus Tip: Use of the field name REF is optional in cross references to bookmark names (i.e., you can use { REF bmCompanyName } or simply {bmCompanyName} as I have done in this example).
Site Note IconBonus Tip: If you change the bookmark value, simply press CTRL+a to select all fields and press F9 to update.
repeating data 10

4. OLE Link

Simply copy the text you want repeated and paste it in the repeated location use menu sequence Edit>Paste Special. Paste as Formatted or Unformatted text and select the radio button "Paste link." This automatically creates a bookmark at the source location and creates a Link field at the destination locations.
repeating data 11

repeating data 12

5. DocProperty

Nearly all of the methods described above apply a cross reference to bookmarked text. Each has its advantages and disadvantages.
  • Even the most basic User Form requires rudimentary VBA macros.
  • Online form must be protected with accompanying limitations
  • Bookmarked text is easily and accidentally deleted
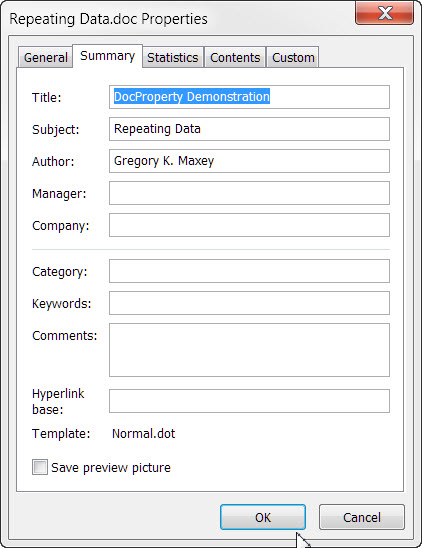
A DocProperty is simple to use and much less prone to be accidentally altered or deleted. There are two types of DocProperties, built-in and custom. To view and apply DocProperties, click File>Properties. The Summary tab lists built in DocProperty names, the Custom tab list a dozen or so pre-named properties. Both tabs provide the user interface for storing document information as properties.

DocProperty demonstration

  • Open the Properties dialog (File>Properties).
  • Click the "Summary" tab.
  • Fill in the Title, Subject, and Author fields then click "OK"
repeating data 13
  • Open the Properties dialog (File>Properties).
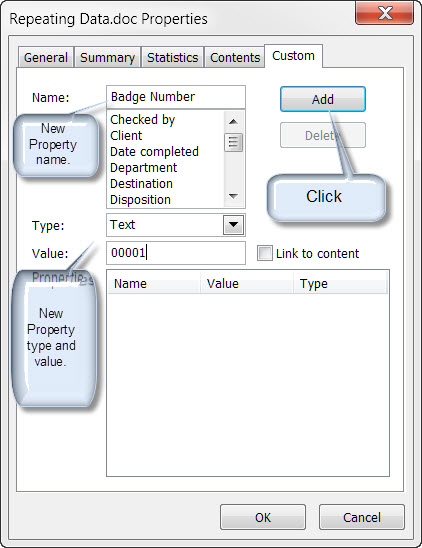
  • Click the "Custom" tab.
  • Type in a unique custom property name (e.g., badge number).
  • Apply a type (text is default).
  • Type in value value (e.g., 0001).
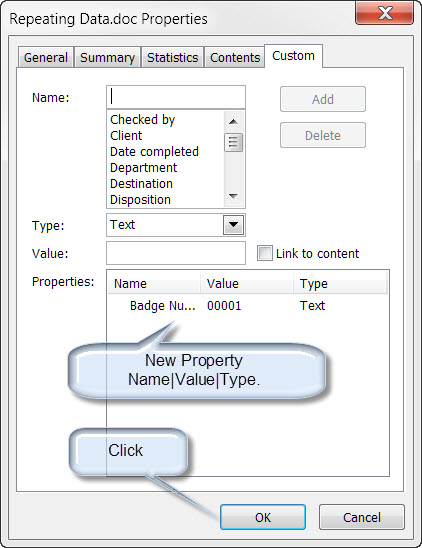
  • Click "Add" then click "OK".
repeating data 14

repeating data 15
  • Now create your fields. We are going to use the three built in fields (Title, Subject, Author) and the custom property (Badge Number) with { DocProperty } fields to populate a form.
Site Note IconNote: Use of the field name "DocProperty" is optional with built-in DocProperties. Field name required with custom document properties and property name must be enclosed in quotes.
repeating data 16
  • Built in and custom DocProperty fields can be used once or multiple times in each document to populate form entries and repeat text. When all of your fields are entered simply select all (CTRL+a) and F9 to update the fields.

6. Automatic User Prompts

Many people ask "How can I set up my document or template so that I am prompted to enter information when I open the document or create a new document." The best answer to this question is to send you back to the Userform. It is the Cadillac interface between the human user and the Word form. Still there are alternatives. Each with its advantages and disadvantages. All are best employed using a template vice individual documents.

FILLIN field

  • A FILLIN field fires a prompt when a new document is created based on a template containing the FILLIN field, when a document containing a FILLIN field is opened, and (very unfortunately) when you print a document containing a FILLIN field if the "Update Fields" option is checked in File>Print>Options>Printing Options. There is no bookmark associated with the FILLIN field.
Site Note IconBonus Tip: You can of course nest a FILLIN field in a Set field to create a bookmark and use REF fields as described in the bookmark method above or ASK method below (e.g., { SET Name{FILLIN "What is your name?"}{REF Name}).
repeating data 17

repeating data 18

ASK & REF fields

  •  An ASK field fires a prompt when the field is specifically instructed to update. Like the FILLIN field, this unfortunately occurs when you print.
  • Unlike a FILLIN fields, ASK fields do not automatically fire the prompt when a new document is created or when an existing document is opened.
  • In addition to firing a prompt, the ASK field sets a bookmark. The bookmark value can then be employed with REF fields to repeat data in multiple fields.
  • In the illustration that follows, the ASK field sets the bookmark value "bmName." The bookmark is used with REF fields to populate the form.
  • Like most Word fields, the ASK field can be updated (and therefore fire the prompt) by selecting the field and pressing F9 or update all document fields by pressing CTRL+a and then F9.
Site Note IconBonus Tip: The following single line of VBA code in a template AUTONEW or AUTOOPEN macro  can be used to auto fire the template ASK field: "ActiveDocument.Fields.Update
repeating data 19

repeating data 20

7. Content Controls

Content Controls (CCs) are a feature introduced with Word 2007.  While they have some room to grow, they are already incredibly versatile and will most likely meet or exceed your needs for repeating data in a document.
The real power of content controls lies in their ability to be bound (or mapped) to a custom XML data node contained in the new OfficeOpenXML file format. Through this binding:
  • All CCs mapped to a unique data node reflect the same value.
  • If you change the value in a document CC that is mapped to a data node then the data node value is also updated and changed.
  • Consequently, all other CCs mapped to that data node are updated and changed.
Do you see the huge impact and advantage? This means that "any and all" of your repeated data fields can serve as a master data field. For example, if you are at the end of a long document and notice a misspelling in a client name you can change it then and there and all previous mapped CCs will update!! You don't have to plow back to the beginning of your document, reopen a form or property dialog, to update data.

Built-in Document Property Content Controls

  • A very simple method of repeating data with content controls without requiring any knowledge of any XML and VBA programing skills or other third party tools is to use the built-in Document Property content controls collection.
  • The collection consists of 15 pre-defined content controls mapped to internal data nodes in the OpenOfficeXMLFormat file structure of the document.
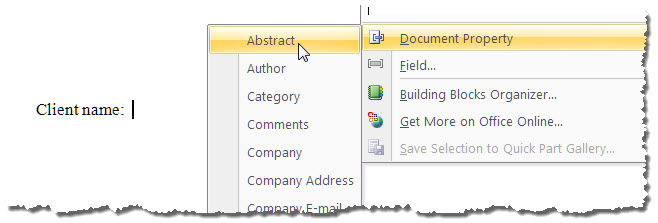
  • Insert the controls in your document using the Insert tab>Text>QuickParts> Document Property menu.
Site Note IconNote:  These controls are actually mapped to the 15 like named built-in document properties and they can provide an effective way to manage those properties. If you insert one and enter a value and then go look at the document properties dialog it should come as no surprise to see the data reflected there. 
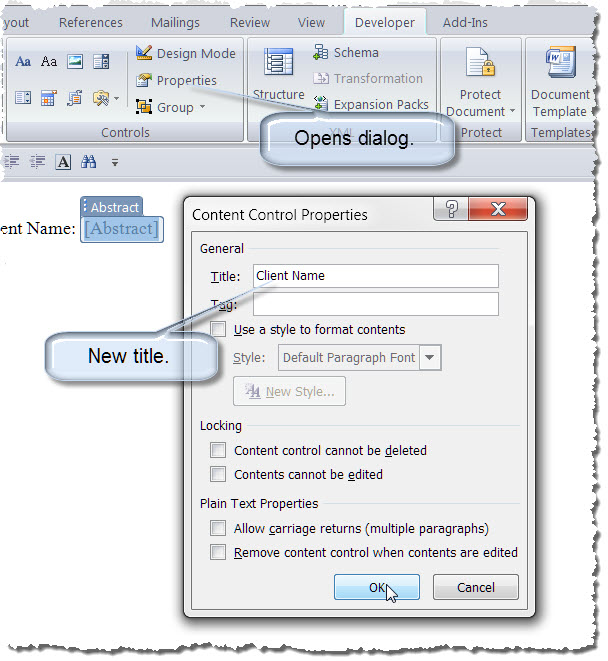
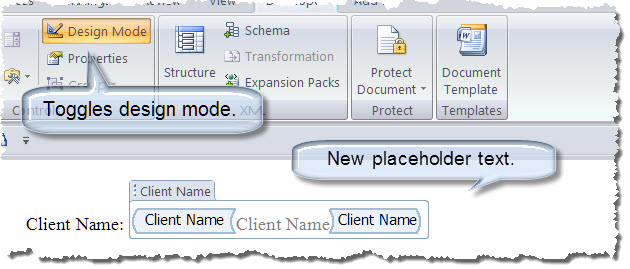
  • But hey, its your application, use it in whatever way make your work easiest. If you need a repeating data field and don't have need for the document property "Abstract" (for example), insert the "Abstract" control in your document, use the Developer tab>Controls>Properties dialog to rename it to suit your needs and your job is done. 
repeating data 21
Insert Document Property Content Control

repeating data 22
Assign a meaningful title using CC Properties dialog

repeating data 23
Define placeholder text as required.


Copy and past CC as required.

repeating data 25
Change one and they all change!!
Site Note IconRemember the method discussed above employs the content control designed for the built-in document property "abstract." While we have renamed it "Client Name," it still manages the document property "Abstract." If you should use a { DocProperty "Abstract" } field in the document it will display the value set in the content control. If you change the value of the content control the value of the document property is automatically updated. However, any DocProperty field will not display the changed value until the field is updated.

Simple Linked Content Controls

While not actually mapped, the following quick and simple method was suggested by Aaron Marin via user feedback on this page:
  • Insert a plain text content control.
  • Select the control (by clicking the small control tab)then Developer>ontrols>Properties and define a title for the control.
  • Right click and select "Copy."
  • Position the cursor where you need the text repeated.
  • Using the Home tab click Paste>Paste Special and select the "Paste link" option button. Then in the "As" dropdown select "Unformatted Text" and click "OK."
  • Now anytime the text is changed in the initial control and you exit the control all of the linked copies will update

Advanced Custom Mapping

A full blown discussion of the VBA and "under the hood" workings of the XML data store are beyond the scope of this tips page.  A good understanding of both are required should you decide to roll up your sleeves and create your own detailed custom content control data store.  However, just for for the sake of completeness, the following VBA script will allow you to create multiple content controls mapped to a single data node:
VBA Script:
Sub AddContentControlAndMap()
Dim oCC As Word.ContentControl
Dim oCustomPart As Office.CustomXMLPart
'All new documents already have 3 reserved customXMLParts built-in. We create\use the 4th one.
'If it doesn't exist (and it wont' the first time this code is run _
 then we will throw an error and use that error to create it.
On Error GoTo Err_NoXMLPart
Set oCustomPart = ActiveDocument.CustomXMLParts(4)
Err_ReEntry:
'Create the CC at the selection.
Set oCC = ActiveDocument.ContentControls.Add(wdContentControlText)
With oCC
  'Give it at title
  .Title = "My Mapped CC"
  'Map the CC to the customXMLPart data node.
  .XMLMapping.SetMapping "/ccMap/ccData[1]"
End With
Exit Sub
Err_NoXMLPart:
'Define the customXMLPart and data node.
Set oCustomPart = ActiveDocument.CustomXMLParts.Add("<ccMap><ccData></ccData></ccMap>")
Resume Err_ReEntry
End Sub
    
Site Note iconSee: Installing Macros for instructions on how to set up and use the macros in this tips page.
By adding additional child nodes to the basic XML and judicious management of the mapping, you could dozens or hundreds of content controls linked to dozens or hundreds of unique data nodes.
For your convenience I have included content control mapping in a Word Template add-in co-developed with long time friend and Word MVP Graham MayorMayor & Maxey "Content Control, Variable, Bookmark and Document Property Tools" Add-In.

8. StyleRef Fields

The StyleRef Field is particularly handy for repeating/displaying main body text defined by a specific style in a header or footer.  A basic example is repeating text defined using the "Title" style shown below:
repeating_data_28
Field code

repeating_data_29
Field result

repeating_data_30
The text returned by a StyleRef is defined by several factors 1) the style name 2) applied switches, and 3) field location in the document.  In the following example I have created a character style named WordDef and applied it to first word in each listed definition:
repeating_data_31
repeating_data_32
When the fields result is displayed the resulting text is evaluated according to the following rules:
  •  Word searches the current page, from top to bottom, for the specified style.
  • If the style isn't found, Word searches next from the top of the page to the beginning of the document, and then from the bottom of the page to the end of the document.
  • If the \l switch is used, Word searches from the bottom of the page to the beginning and then to the end of the document.
repeating_data_34
repeating_data_35
Site Note iconNote: The style referenced must be applied to text in the main body of the document.  Otherwise the field will return "Error - No text of specified style found in document."
For a full list of StyleRef field switch and position behavior, see:  StyleRef Field

9. Document Variables

Lastly, the "Hidden Gems" in Word, Document Variables.  Created, edited and destroyed only with VBA, Document Variables provide a robust method for storing information.  This stored information remains part of the document and is ready for repeated using even if a document is closed and then reopened.  This information is easily retrieved and displayed in your document using the DocVariable field. The following template contains examples of the document variable and DocVariable fields used to create a simple form.  The template also provides examples of setting document properties using VBA: VBA Template.
Site Note IconNote:  For more on document variables, see my: Create and Employ a Userform.
That's it! I hope you have found this tips page useful and informative.